DISCLAIMER: The scripts and screen set described at this page are dedicated to the concrete machine and must be reconfigured and tested if used for any purpose. Author does not take any responsibility for any damage, injury or lost caused by using of these sources.
DISCLAIMER: The scripts and screen set are published and shared for free and are not a part of any sold item by any selling channel. User is allowed to download, modify and share the scripts and screen set. Author does not guarantee, that scripts and/or screen set will work to your system. Any ordered item can not be claimed, based on fact, that this scripts and/or screen set do not work in the customer’s system.
IMPORTANT: Everytime carefully check the function of the scripts “in the free space”, without a probe touching a material or TLS. You will prevent a damage of a probe, TLS or a machine.
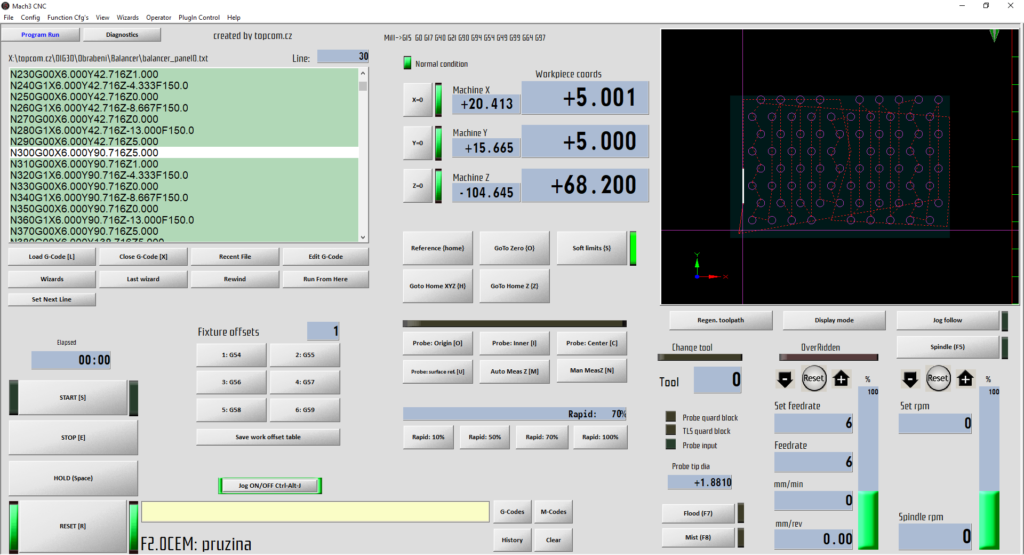
I started with MACH3 several years ago. This software is pretty nice, but I really hate the original screen set – graphical UI. Especially when used at wide screen displays. As I was deeper in the software, I found a possibility how to modify the screen set and make it more simple, as simple as possible. My simple screen set is ready for a router or any 3axis milling machine.
I’ve been asked by some users, if it would be possible to share the screen set and macros for probing with my probes. Based on these requests I decided to publish all information for free as a solution page. Feel free to use these information and use them as you want.
If you have any questions, just ask. But please keep in mind, that my capacity is limited, so can happens, that I would not be able to respond all questions in the deep details 🙂 So let’s start!
Specification:
- MACH3 screen set and the scripts prepared for probing with these devices:
- DIG3D, 3axis probes
- DIG-Z and DIG-Z.Fix, Tool length sensors
- SMART.MER/2 and SMART.GUARD, probe guarders
- debugged in MACH3 Version R3.043.062. In case of older version can happen, that some features may not work.
Download:
Screen set is edited by MachScreen software tool. It can be downloaded here:
In section “Program downloads/MachScreen”
How to install:
- backup your MACH3 folder with all subfolders to be able to return back, if something happens 🙂
- download and unpack the file from the download section (above)
- copy the screen set “simple3axis.set” to the MACH3 root directory
- copy all files from the “macros” folder to your current profile script folder “…Mach3/macros/profilename/“
- install both fonts from the “fonts” folder to Windows
- run MACH3 and change the current screen set:

Browse “simple3axis.set” file.
- Setup the fonts:


- Setup the “Auto screen Enlarge” in the General Config dialog:
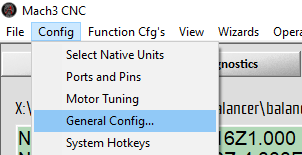
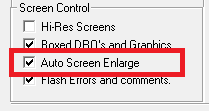
- Restart MACH3
Now the screen set and the scripts are installed.
Screen set description:
MACH3 screen set is divided to the several sections:

Section 1, G-code operations
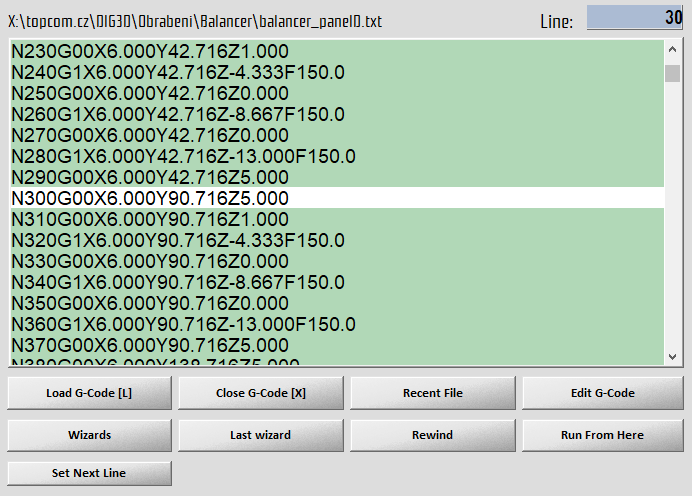
| Object | Function | Shortcut |
| Load G-Code [L] | Open dialog for G-code file loading | Ctrl + L |
| Close G-Code [X] | Close the current G-code file | Ctrl + X |
| Recent file | Open recent file | |
| Edit G-Code | Edit G-code area | |
| Wizards | Open the dialog with installed wizards | |
| Last wizard | Run the last wizard | |
| Rewind | Go to the first line | |
| Run From Here | Start program from the current position |
Section 2, Coordinates

| Object | Function | Shortcut |
| X=0, Y=0, Z=0 | Reset X, Y or Z workpiece coordinate | |
| Machine X, Y, Z | Absolute machine X, Y and Z coordinates | |
| Workpiece coords | Workpiece X, Y and Z coordinates | |
| Normal condition | Normal condition indicator | |
Section 3, Fixture offsets (workpiece offsets)
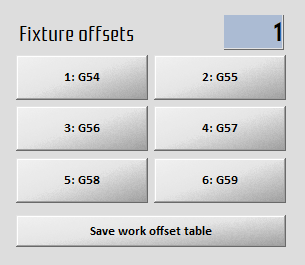
| Object | Function | Shortcut |
| DRO | Displays the number of current fixture offset | |
| 1 – 6 | Sets the fixture (workpiece offset) 1: G54 runs “G54” gcode …. 6: G59 runs “G59” gcode | |
| Save work offset table | Save all changes to the workpiece offsets. Will be loaded in the next app start. | |
Section 4, Basic movements

| Object | Function | Shortcut |
| Reference {home} | Run all axis reference | Alt + Home |
| GoTo Zero {O} | Go to workpiece zero point (equal to “G0 X0 Y0 Z0”) | Alt + O |
| GoTo Home XYZ {H} | Go to machine home position in all axis (Machine X=0, Y=0, Z=0), runs macro M501 | Alt + H |
| GoTo Home Z {Z} | Go to machine home position in Z axis (Machine Z=0), runs macro M500 | Alt + Z |
| Soft limits {S} | Enable/disable soft limits function | Alt + S |
Section 5, Probing functions

| Object | Function | Shortcut |
| Probe: Origin [O] | Probe left bottom outer corner position by a probe, runs macro M556 P1 | Ctrl + O |
| Probe: Inner [I] | Probe left bottom inner corner position by a probe, runs macro M556 P11 | Ctrl + I |
| Probe: Center [C] | Probe center of a hole by probe, runs macro M556 P10 | Ctrl + C |
| Probe: surface ref. [U] | Measure a surface reference height to fixed TLS, runs macro M542 | Ctrl + U |
| Auto Meas Z [M] | Measure a tool height by Fixed TLS, runs macro M543 | Ctrl + M |
| Man MeasZ [N] | Measure a tool height by a hand operated TLS, runs macro M555 | Ctrl + N |
Section 6, Rapid movement

| Object | Function | Shortcut |
| DRO | Display a current rapid move speed coefficient | |
| Rapid: 10% | Set rapid move for manual jog to 10% | Alt + 1 |
| Rapid: 50% | Set rapid move for manual jog to 50% | Alt + 2 |
| Rapid: 70% | Set rapid move for manual jog to 70% | Alt + 3 |
| Rapid 100% | Set rapid move for manual jog to 100% | Alt + 4 |
Section 7, Tool settings

| Object | Function | Shortcut |
| Change tool LED | Indicates, that machine is in the tool change procedure (M6) | |
| Tool DRO | Current tool number | |
| Probe guard block LED | Indicates status of output 5, dedicated to blocking of probe guard function | |
| TLS guard block LED | Indicates status of output 6, dedicated to blocking of TLS guard function | |
| Probe input | Indicates status of probe input | |
| Probe tip dia DRO | Allows to setup a probe tip diameter. Value is used in the scripts | |
| Flood (F7) | Toggle flood output state | F7 |
| Mist (F8) | Toggle mist output state | F8 |
Section 8, Feed rate
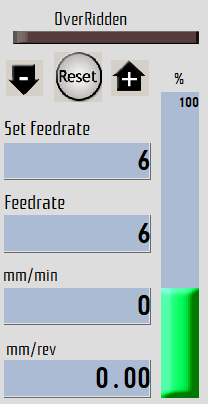
| Object | Function | Shortcut |
| OverRiden LED | Indicates, that feed rate coefficient <>100% | |
| “-” button | Decrease feedrate coefficient percentage | |
| “+” button | Increase feedrate coefficient percentage | |
| Reset button | Reset feedrate coefficient to 100% | |
| Set feedrate | Currently set feed rate by G-code | |
| Feedrate | Real feedrate (set feedrate multiplied by feedrate coefficient) | |
| mm/min | feedrate in units/minute | |
| mm/rev | feedrate in units/revolution |
Section 9, Spindle
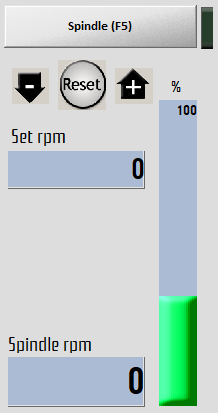
| Object | Function | Shortcut |
| Spindle (F5) | Toggle spindle run | F5 |
| “-” button | Decrease spindle rpm coefficient percentage | |
| “+” button | Increase spindle rpm coefficient percentage | |
| Reset button | Reset spindle rpm coefficient to 100% | |
| Set rpm | Currently set spindle rpm by G-code | |
| Spindle rpm | Real spindle rpm (set rpm multiplied by spindle coefficient) |
